
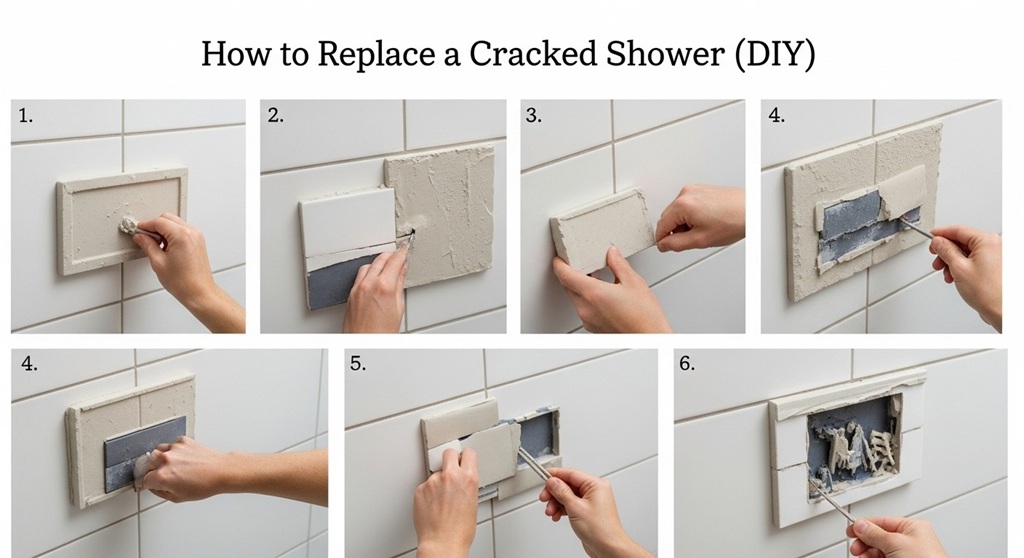

A cracked shower tile can lead to water damage, mold growth, and costly repairs if ignored. The best way to replace a cracked shower tile is to carefully remove the damaged tile, clean the surface, apply new adhesive, install a replacement tile, and seal the joints with grout. This DIY repair helps maintain the waterproof integrity of your shower and prevents further structural damage.
Many homeowners notice cracked tiles but delay fixing them because the process seems complex. In reality, replacing a shower tile is manageable with the right tools and clear steps. According to data from the National Association of Home Builders (NAHB), bathroom repairs such as tile replacement are among the most common DIY home maintenance tasks, with more than 60% of homeowners choosing DIY solutions for small repairs.
If you learn how to replace cracked shower tile properly, you can avoid water seepage behind walls, prevent mold growth, and extend the lifespan of your bathroom tiles. This guide explains the process step-by-step using a practical approach based on real renovation practices and professional recommendations.
Let’s start by understanding why cracked tiles should be repaired quickly and what tools you need before starting.
Why Should You Replace a Cracked Shower Tile Immediately?
Quick Answer: You should replace cracked shower tiles immediately because cracks allow water to penetrate behind the tile, which can damage drywall, weaken the substrate, and cause mold growth.
The problem with cracked shower tiles is not just cosmetic. The main risk is moisture infiltration. Shower areas experience constant water exposure. When a tile cracks, it creates small pathways for water to seep behind the wall.
The Hidden Risks of Ignoring a Cracked Tile
- Water damage behind the wall – Moisture can weaken cement boards and drywall.
- Mold and mildew growth – Bathrooms provide ideal humidity levels for mold.
- Loose surrounding tiles – Water infiltration weakens adhesive.
- Higher repair costs – Small tile replacement may turn into full wall replacement.
A case study from a residential renovation report published by HomeAdvisor showed that homeowners who ignored cracked shower tiles for more than 12 months faced repair costs averaging $1,000–$3,000 due to water damage behind walls. In contrast, replacing a single tile usually costs less than $20–$50 in materials.
This clear difference highlights why small repairs should be handled early.
What Tools and Materials Are Needed to Replace a Cracked Shower Tile?
Quick Answer: To replace a cracked shower tile, you typically need safety glasses, a grout saw, hammer, chisel, replacement tile, tile adhesive, grout, and a sponge.
Before starting your DIY tile repair, gather the necessary tools. Having everything ready prevents interruptions during the process.
Essential Tools
- Safety glasses and gloves
- Grout removal tool or grout saw
- Hammer
- Chisel or putty knife
- Utility knife
- Tile spacers
- Notched trowel
- Sponge
Materials Required
- Replacement tile matching the existing one
- Thin-set mortar or tile adhesive
- Tile grout
- Tile sealant (optional but recommended)
| Material | Purpose |
|---|---|
| Thin-set mortar | Bonds the tile to the wall |
| Grout | Fills gaps between tiles |
| Tile spacers | Maintains even tile spacing |
| Sealant | Protects grout from moisture |
Using the right materials ensures the new tile remains secure and waterproof.
How Do You Remove a Cracked Shower Tile Safely?
Quick Answer: Remove a cracked shower tile by first removing the grout around it, then gently breaking the tile and chiseling out the pieces without damaging surrounding tiles.
This step requires patience. Rushing may damage adjacent tiles.
Step-by-Step Tile Removal Process
1. Remove the Grout Around the Tile
Use a grout saw to scrape away grout around the cracked tile. Remove as much grout as possible to separate the tile from neighboring tiles.
2. Break the Tile Carefully
Place a chisel in the center of the tile and tap lightly with a hammer. The tile should crack further, allowing pieces to loosen.
3. Remove Tile Fragments
Carefully remove each broken piece using the chisel or putty knife.
4. Scrape Off Old Adhesive
Once the tile is removed, scrape away old mortar or adhesive from the wall surface. The area must be flat and clean before installing a new tile.
This process is commonly used by professional tile installers to avoid damaging nearby tiles.
How Do You Prepare the Surface Before Installing the New Tile?
Quick Answer: The surface should be cleaned, leveled, and free from old mortar before installing a replacement tile.
Surface preparation is one of the most important steps in tile replacement. Poor preparation can cause the tile to loosen or become uneven.
Preparation Checklist
- Remove leftover mortar completely
- Clean dust and debris
- Ensure the surface is flat
- Check for moisture damage
If you notice damaged drywall or backer board behind the tile, repair it before installing the new tile. Otherwise, the replacement tile may fail.
How Do You Install the Replacement Shower Tile?
Quick Answer: Apply thin-set adhesive to the prepared surface, press the replacement tile firmly into place, and align it with spacers to match surrounding tiles.
Step-by-Step Installation Process
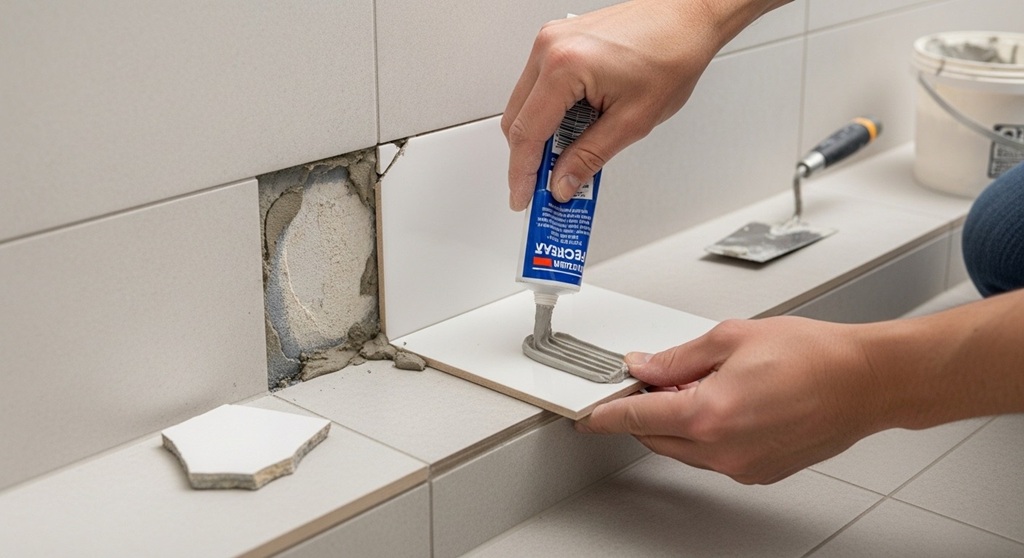
1. Apply Tile Adhesive
Spread thin-set mortar evenly using a notched trowel.
2. Position the Replacement Tile
Press the tile firmly into the adhesive.
3. Align With Tile Spacers
Insert spacers around the tile to maintain consistent gaps.
4. Check Tile Alignment
Make sure the tile sits level with surrounding tiles.
Allow the adhesive to cure for at least 24 hours before applying grout.
How Do You Apply Grout After Replacing the Tile?
Quick Answer: Spread grout into the joints using a grout float, remove excess grout with a sponge, and allow it to cure.
Grouting Process
- Mix grout according to manufacturer instructions
- Apply grout diagonally across tile joints
- Remove excess grout with a damp sponge
- Allow grout to cure for 24–48 hours
After curing, apply grout sealant if recommended. Sealant helps prevent water penetration and extends grout lifespan.
How Long Does It Take to Replace a Shower Tile?
Quick Answer: Replacing a single shower tile typically takes 2–4 hours of active work, but curing time can extend the project to 24–48 hours.
The process includes tile removal, surface preparation, tile installation, and grout curing.
| Step | Estimated Time |
|---|---|
| Tile removal | 30–45 minutes |
| Surface cleaning | 20 minutes |
| Tile installation | 30 minutes |
| Adhesive curing | 24 hours |
| Grouting | 30 minutes |
Most DIY homeowners can complete the active work within a few hours.
What Common Mistakes Should You Avoid When Replacing Shower Tiles?
Quick Answer: Common mistakes include damaging nearby tiles, skipping surface preparation, using the wrong adhesive, and grouting too early.
Frequent DIY Mistakes
- Not removing enough grout before tile removal
- Installing the new tile on uneven adhesive
- Forgetting tile spacers
- Grouting before adhesive cures
- Ignoring moisture damage behind the tile
A renovation report by the Tile Council of North America indicates that poor surface preparation is responsible for more than 40% of tile installation failures.
Conclusion: Should You Replace a Cracked Shower Tile Yourself?
Replacing a cracked shower tile may look intimidating, but it is one of the most manageable bathroom repair tasks. The key steps are simple: remove grout, take out the damaged tile, prepare the surface, install a replacement tile, and apply fresh grout.
Addressing the issue quickly prevents water damage, protects the structural integrity of your bathroom wall, and saves repair costs in the long run. A small repair done today can prevent thousands of dollars in future renovations.
If your bathroom has multiple cracked tiles or hidden water damage, consider consulting a professional. However, for a single cracked tile, this DIY repair is practical, affordable, and achievable for most homeowners.
Take action today. Inspect your shower tiles and replace any damaged ones before they turn into bigger problems.
Frequently Asked Questions (FAQs)
Can I replace just one cracked shower tile?
Yes. If the surrounding tiles and substrate are in good condition, you can replace a single cracked tile without removing the entire wall.
What causes shower tiles to crack?
Common causes include impact damage, poor installation, structural movement, and water infiltration behind tiles.
Do I need special adhesive for shower tiles?
Yes. Thin-set mortar designed for wet environments is recommended because it provides strong bonding and moisture resistance.
How do I match the replacement tile?
The best option is to use spare tiles left from the original installation. If unavailable, bring a sample tile to a hardware store for matching.
Is it necessary to seal grout in the shower?
Sealing grout is recommended because it helps prevent water absorption and mold growth.
Can cracked tiles cause mold?
Yes. Cracks allow water to seep behind the tile, creating damp conditions where mold can grow.
When should I call a professional?
If you notice loose tiles, water damage behind walls, or multiple cracked tiles, a professional inspection may be necessary.
Read More Also: Dynamic vs Static Rope: How to Choose the Right Type for Your Needs
Find out: Upright vs Canister Vacuum: How to Decide What’s Best for You