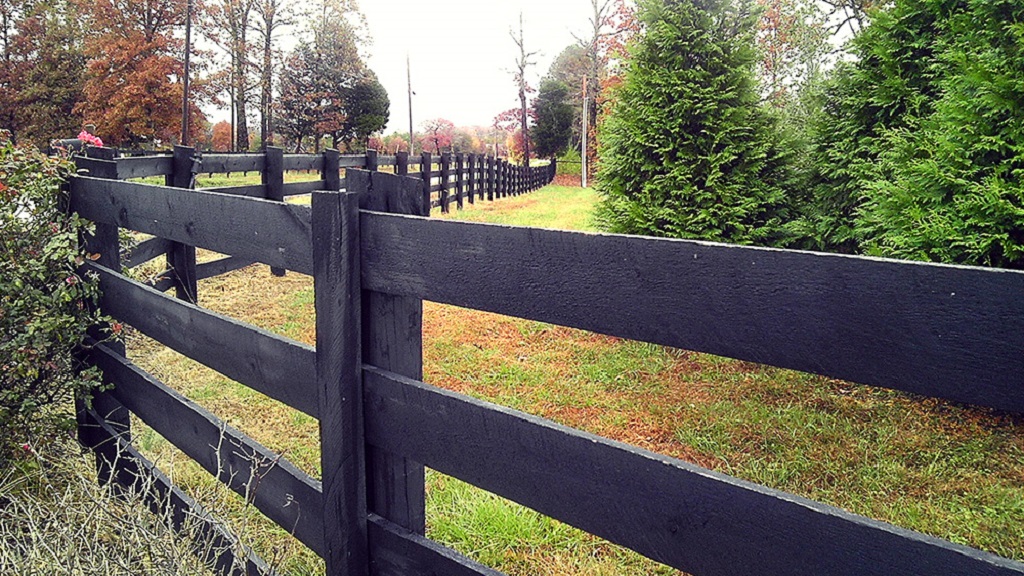
In the world of garden design, few elements carry the timeless allure and rustic charm quite like a round wood fence. These humble yet elegant structures have adorned gardens for centuries, adding character, privacy, and a touch of natural beauty to outdoor spaces.
As a garden decoration professional, I’ve witnessed firsthand the transformative power of a well-crafted round wood fence. In this post, I’ll delve into why these fences are essential for any garden enthusiast and provide detailed insights on how to set up round wood fence posts, whether your ground is soft or firm.
The Allure of Round Wood Fences:
Before we dive into the nitty-gritty of installation, let’s first explore why round wood fences are such a beloved feature in garden design. Unlike their angular counterparts, round wood fences exude a sense of softness and harmony, seamlessly blending into their surroundings. Their organic curves mimic the natural shapes found in the garden, creating a harmonious flow that enhances the overall aesthetic.
Moreover, round wood fences offer practical benefits as well. They provide a sense of enclosure and privacy without completely blocking off the view, allowing you to enjoy your garden while maintaining a sense of seclusion. Additionally, these fences serve as a versatile backdrop for climbing plants, adding vertical interest and greenery to your outdoor space.
Setting Round Wood Fence Posts on Soft Ground:
One of the most common challenges when installing a round wood fence is dealing with soft ground. Soft soil can make it difficult for fence posts to stay upright and secure. However, with the right techniques, you can ensure a stable and long-lasting installation.
-
Installing Directly into Soil:
If your ground is soft and relatively stable, you can install round wood fence posts directly into the soil. Here’s how:
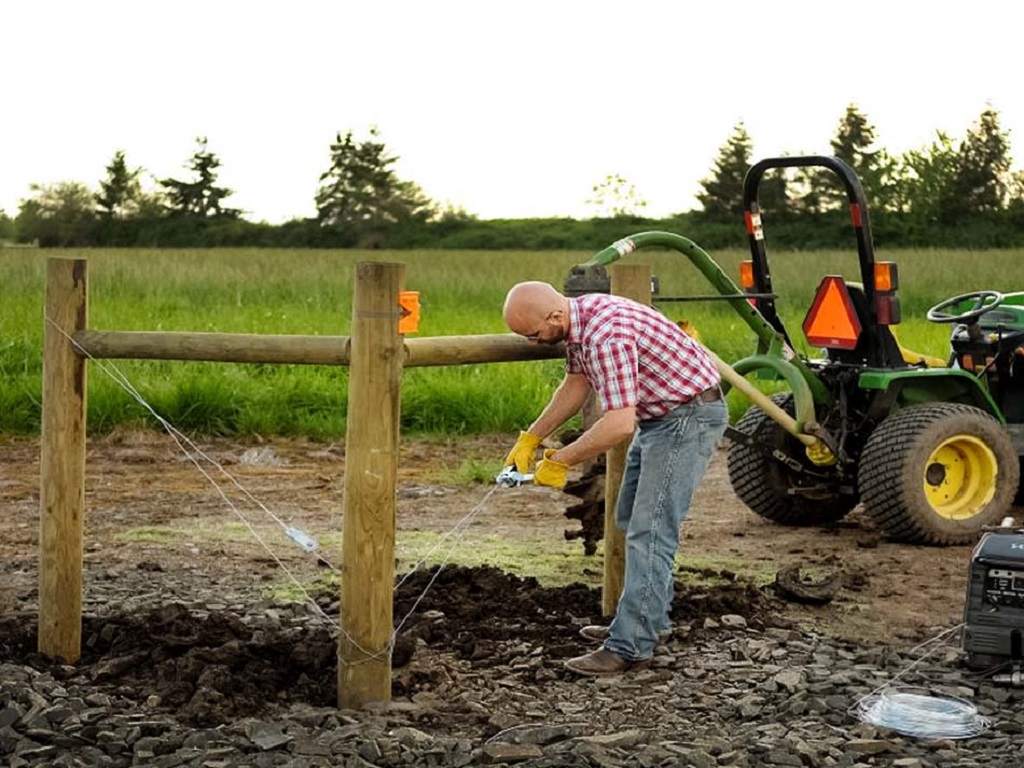
a. Begin by digging a hole using a post-hole digger or a shovel. The depth of the hole should be approximately one-third to one-half the length of the fence post.
b. Place the round wood fence post into the hole, ensuring it is plumb and level.
c. Backfill the hole with soil, tamping it down firmly as you go to eliminate air pockets.
d. Continue this process for each fence post, spacing them evenly according to your desired fence design.
Setting with Gravel:
For areas with particularly soft or sandy soil, setting round wood fence posts with gravel can provide added stability. Here’s how to do it:
a. Dig a hole as described above, but make it slightly wider than the diameter of the fence post.
b. Fill the bottom of the hole with a layer of gravel, approximately 6 inches deep.
c. Place the fence post into the hole and fill the surrounding space with more gravel, ensuring the post is plumb and stable.
d. Tamp down the gravel to compact it and provide additional support for the post.
e. Backfill the remainder of the hole with soil, tamping it down firmly.
Installing Round Wood Fence Posts with Concrete:
For maximum stability, especially in areas with soft or unstable ground, setting round wood fence posts with concrete is often the preferred method. Here’s how to do it:
- Dig the holes for the fence posts as described earlier, ensuring they are of the appropriate depth and spacing.
- Place the round wood fence post into the hole, ensuring it is plumb and level.
- Mix concrete according to the manufacturer’s instructions, using a wheelbarrow or mixing tub.
- Pour the concrete into the hole around the fence post, filling it to ground level.
- Use a level to ensure the fence post remains straight and plumb while the concrete sets.
- Allow the concrete to cure completely before continuing with the fence installation process.
In the world of garden decoration, few elements can match the timeless appeal and rustic charm of a round wood fence. These simple yet elegant structures not only enhance the aesthetic of your outdoor space but also provide practical benefits such as privacy and support for climbing plants.
When it comes to setting up round wood fence posts, the key is to choose the right method for your specific soil conditions. Whether you’re installing directly into soft ground, setting with gravel, or using concrete for maximum stability, careful attention to detail and proper technique will ensure a sturdy and long-lasting fence that enhances your garden for years to come. So go ahead, embrace the beauty of round wood fences, and transform your garden into a haven of natural elegance.
Setting and Installing Round Wooden Fence Posts for Garden Fencing:
Setting and installing round wooden fence posts for garden fencing is a crucial step in creating a durable and visually appealing enclosure for your outdoor space. Whether you’re aiming for a rustic aesthetic or a more polished look, proper installation is key to ensuring the longevity and stability of your fence. In this guide, we’ll discuss the essential steps for setting and installing round wooden fence posts effectively.
-
Planning and Preparation:
Before you begin the installation process, it’s essential to plan out your fence layout and gather all the necessary materials and tools. Measure the perimeter of your garden to determine the number of fence posts needed and the spacing between them. Additionally, ensure you have the appropriate equipment on hand, including a post-hole digger or shovel, level, measuring tape, gravel, concrete (if necessary), and of course, the round wooden fence posts themselves.
-
Choosing the Right Posts:
Selecting high-quality round wooden fence posts is crucial for a sturdy and long-lasting fence. Opt for pressure-treated or naturally rot-resistant wood species such as cedar or redwood, which are better equipped to withstand the elements. Additionally, consider the diameter and height of the posts based on your aesthetic preferences and the intended purpose of the fence.
-
Digging the Post Holes:
Using a post-hole digger or shovel, begin digging the holes for the fence posts along the predetermined fence line. The depth and diameter of the holes will depend on the size of your posts and the type of soil in your garden. As a general rule, aim for a hole depth that is at least one-third to one-half the length of the fence post, with a diameter slightly wider than the post itself.
-
Setting the Posts:
Once the holes are dug, it’s time to set the round wooden fence posts. Place each post into its respective hole, ensuring it is level and plumb. Use a level to check both the vertical and horizontal alignment of the post, making adjustments as needed. This step is crucial for ensuring a straight and visually appealing fence line.
-
Securing the Posts:
Depending on your soil conditions and personal preferences, there are several methods for securing the fence posts in place:
-
- Directly into Soil: If your soil is relatively firm and stable, you may choose to backfill the holes with soil and tamp it down firmly around the posts.
- Setting with Gravel: For softer or sandy soil, filling the bottom of the holes with gravel before placing the posts can provide added stability. Pack the gravel tightly around the posts, ensuring they remain level and upright.
- Installing with Concrete: In areas with particularly soft or unstable soil, setting the fence posts in concrete offers maximum stability and longevity. Mix the concrete according to the manufacturer’s instructions and pour it into the holes around the posts. Use a level to ensure the posts remain straight and plumb while the concrete sets.
-
Allowing for Proper Cure Time:
If you’ve opted to set the fence posts in concrete, it’s essential to allow an adequate curing time before proceeding with further construction. Follow the manufacturer’s recommendations for the specific type of concrete used, typically allowing at least 24 to 48 hours for the concrete to set fully.
-
Installing Rails and Panels:
Once the fence posts are securely in place, it’s time to install the horizontal rails and panels to complete the fence structure. Depending on your design preferences, you may choose to attach the rails directly to the posts using nails or screws, or you may opt for a more intricate joinery method for a seamless look.
-
Finishing Touches:
Finally, add any finishing touches to enhance the appearance and functionality of your fence. This may include staining or painting the wood for added protection and aesthetics, adding decorative accents such as finials or post caps, or incorporating gates and latches for convenient access to your garden.
By following these steps for setting and installing round wooden fence posts, you can create a beautiful and functional garden enclosure that enhances the overall appeal of your outdoor space. Whether you’re designing a balcony garden or transforming a sprawling backyard, the addition of a well-crafted fence can define boundaries and add character to your landscape. Remember to take your time during the installation process, paying careful attention to detail to ensure a sturdy and long-lasting fence that will withstand the test of time.